Welcome to firstTechTricks, your one-stop shop for anything about utilizing Arduino to build home automation systems. The basic concepts of home automation using Arduino will be covered in this blog, along with a breakdown of the key elements, block diagrams of the system, a list of the necessary components, circuit diagrams, an explanation of the operating principle, and even Arduino code examples.
Home automation has become a game-changer in a time when technology enables us to live more frugally and conveniently. Imagine being able to manage your home’s lights, appliances, and other gadgets using only your voice. It is attainable with the help of Arduino and is not the stuff of science fiction. We’ll delve into the fascinating world of homes in this blog post.
In this blog post, we’ll delve into the exciting realm of home automation using Arduino, specifically focusing on voice control through an Arduino, HC-05 Bluetooth Module, and relay setup.
Understanding Arduino for Home Automation
Arduino is an open-source electronics platform, known for its versatility and user-friendliness. It’s equipped with input and output pins, making it ideal for connecting sensors, switches, and actuators. With Arduino at your disposal, you have the foundation for building your DIY home automation system.
Creating Your Voice-Controlled Home Automation Using Arduino
Before we get into the technical details, let’s outline the essential components you will need which you can purchase from the given link:
I am providing online resources where you can buy at cheapest price.
- Arduino Uno Board
- HC-05 Bluetooth Module
- Relay Module
- Connecting Wires
- Power Supply (You can use batteries or a USB power source.)
- Smartphone
Now, let’s get started:
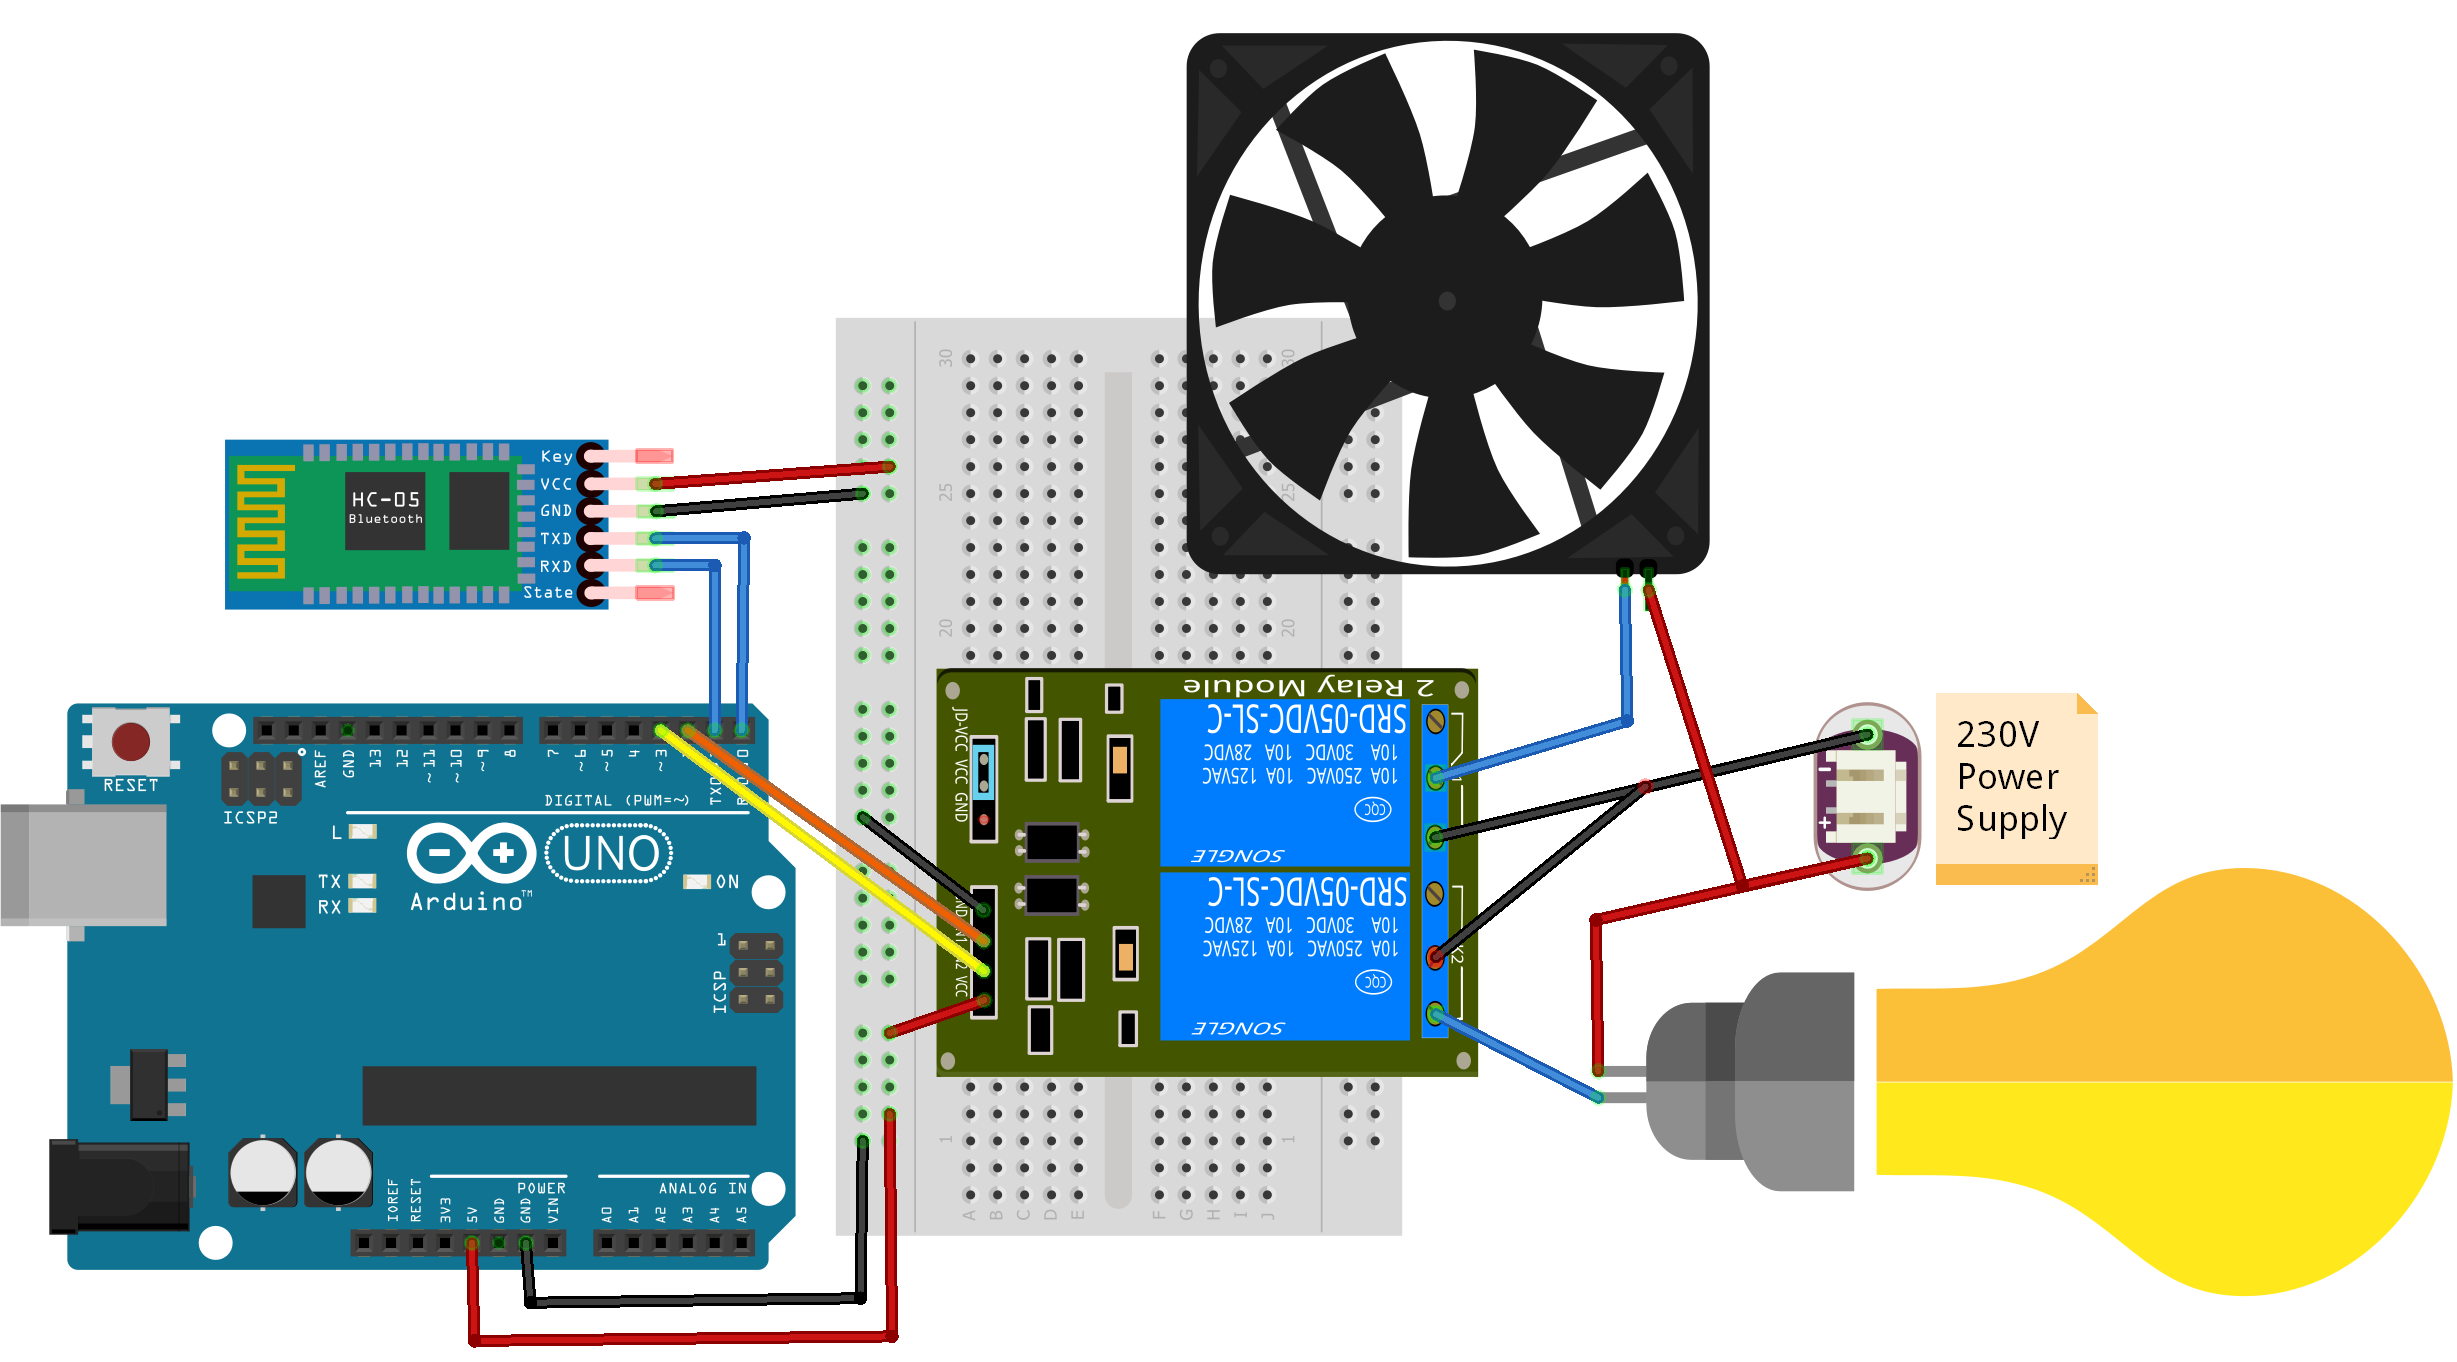
1. Assembling Your Hardware
Begin by connecting the components as follows:
- Attach the HC-05 Bluetooth Module to your Arduino.
- Connect the relay module to control your appliances.
- Make sure all connections are secure and double-check the wiring.

2. Setting Up the Arduino IDE
To program your Arduino, you’ll need to use the Arduino IDE (Integrated Development Environment). Install it on your computer and ensure you have the necessary drivers installed for your Arduino board.
3. Writing the Arduino Code
You’ll write code that enables your Arduino to receive voice commands from your smartphone via the HC-05 Bluetooth Module. The code will interpret these commands and trigger the corresponding relays to control your devices.
#define fan 2
#define light 3
void setup() {
// put your setup code here, to run once:
Serial.begin(9600);
pinMode(fan, OUTPUT);
pinMode(light, OUTPUT);
}
void loop() {
// put your main code here, to run repeatedly:
if(Serial.available() == 1)
{
String val = Serial.readString();
Serial.println(val);
if(val == “fan on”)
{
digitalWrite(fan, HIGH);
}
if(val == “fan off”)
{
digitalWrite(fan, LOW);
}
if(val == “light on”)
{
digitalWrite(light, HIGH);
}
if(val == “light off”)
{
digitalWrite(light, LOW);
}
if(val == “all on”)
{
digitalWrite(fan, HIGH);
digitalWrite(light, HIGH);
}
if(val == “all off”)
{
digitalWrite(light, LOW);
digitalWrite(fan, LOW);
}
}
}
4. Pairing Your Smartphone
Pair your smartphone with the HC-05 Bluetooth Module. Once connected, you can use a voice command app on your smartphone to send commands like “Turn on the lights” or “Switch off the fan.”

5. Working Principle of Voice Control Home Automation using Arduino
Initially, we must select 8 distinct voice commands for managing 4 devices. Each device is controlled by a pair of specific voice commands. For instance, the command ‘turn on light’ activates the light, while ‘turn off light’ deactivates it. These voice commands are integrated into the Arduino code. Below, you’ll find the list of voice commands incorporated into the Arduino code:
| Voice commands | Device status | Control Relay (Relay Pin) |
| turn on light | Light On | Relay-1 (IN1) |
| turn off light | Light Off | |
| turn on fan | Fan On | Relay-2 (IN2) |
| turn off fan | Fan Off | |
| turn on all | All On | Relay-1, Relay-2 (IN1, IN2) |
| turn off all | All Off |
I am final, I am sorry, but it at all does not approach me. Who else, can help?